
C++ Fast-track for Games Programming Part 11: Tiles
It is time to introduce you to a great concept for 2D graphics in C++, that you will find very useful and easy to use: tilemaps.
Previous Part: ArraysNext Part: Classes
For this tutorial, we’ll be using the same template from the 2nd tutorial:
 TheTemplate.zip
Tilemaps
Have a look at this image:
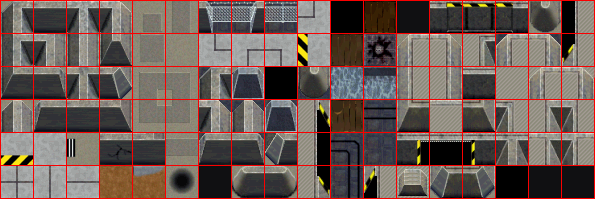
Tilemap for a sprite based game. Save this image to your computer.
This is a set of tiles I made for a mobile game (a long time ago). You can download it here: https://jbikker.github.io/files/nc2tiles.png
These tiles can be used to construct a background for a game. The average programmer is perfectly capable of producing his/her own level art this way, for example:
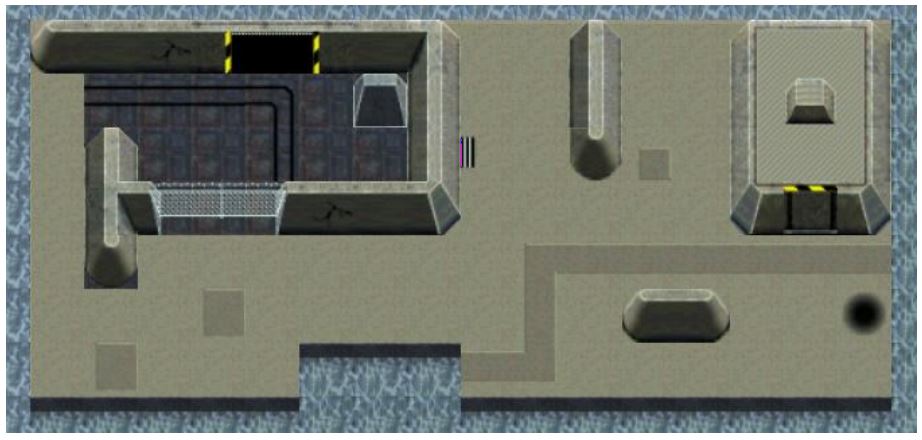
A game level built with a set of tiles.
Now that’s a fine backdrop for a stealth tank adventure game!
My First Tilemap
Copy nc2tiles.png file to the assets folder of a fresh template directory. Then, enter the following code:
|
1 2 3 4 5 6 7 8 9 10 11 12 13 14 15 16 17 18 19 20 21 22 23 24 25 26 27 28 29 30 31 32 33 34 35 36 37 |
#include "game.h" #include "surface.h" namespace Tmpl8 { void Game::Init() {} void Game::Shutdown() {} Surface tiles("assets/nc2tiles.png"); char map[5][30] = { "kc kc kc kc kc kc kc kc kc kc", "kc fb fb fb kc kc kc kc kc kc", "kc fb fb fb fb fb kc kc kc kc", "kc lc lc fb fb fb kc kc kc kc", "kc kc kc lc lc lc kc kc kc kc" }; void Game::Tick(float deltaTime) { screen->Clear(0); for (int y = 0; y < 5; y++) for (int x = 0; x < 10; x++) { int tx = map[y][x * 3] - 'a'; int ty = map[y][x * 3 + 1] - 'a'; Pixel* src = tiles.GetBuffer() + 1 + tx * 33 + (1 + ty * 33) * 595; Pixel* dst = screen->GetBuffer() + x * 32 + y * 32 * 800; for (int i = 0; i < 32; i++) { for (int j = 0; j < 32; j++) dst[j] = src[j]; src += 595, dst += 800; } } } }; |
That’s a bit more code than usual, but we will make good use of it. Let’s go over the details.
The Tick function draws 5 lines of 10 tiles each for a total of 50 tiles. Each tile is specified using two characters in the array: the first one specifies the column (a … r), the second one the line (a … f). The spaces in the array are just there for clarity. Using the coordinates of a tile (in tx and ty) we can find its first pixel. The address of this pixel is stored in variable src (source). The destination address (dst) is in the screen buffer; the way this is calculated should be pretty obvious. Finally, we loop over the pixels of a single tile to draw it to the screen.
Some Clarity
We can improve the above code by isolating the tile rendering code. Add a function DrawTile just above your Tick function:
|
18 19 20 21 22 23 24 25 |
void DrawTile( int tx, int ty, Surface* screen, int x, int y ) { Pixel* src = tiles.GetBuffer() + 1 + tx * 33 + (1 + ty * 33) * 595; Pixel* dst = screen->GetBuffer() + x + y * 800; for( int i = 0; i < 32; i++, src += 595, dst += 800 ) for( int j = 0; j < 32; j++ ) dst[j] = src[j]; } |
It is the same functionality we had before, but now the deep logic of rendering a single tile is nicely hidden.
In the Tick function, you can now see how much we can simplify it by using this new function DrawTile to simplify the Tick function:
|
28 29 30 31 32 33 34 35 36 37 38 |
void Game::Tick(float deltaTime) { screen->Clear(0); for (int y = 0; y < 5; y++) for (int x = 0; x < 10; x++) { int tx = map[y][x * 3] - 'a'; int ty = map[y][x * 3 + 1] - 'a'; DrawTile(tx, ty, screen, x * 32, y * 32); } } |
Which is far easier on the eyes.
Player
Now that we have a map, we need a player to explore it.
Let’s load a sprite for this:
|
19 |
Sprite tank( new Surface( "assets/ctankbase.tga" ), 16 ); |
The player needs coordinates:
|
20 |
int px = 0, py = 0; |
It needs to be drawn by adding this to the Tick function:
|
41 |
tank.Draw( screen, px, py ); |
And finally, we need to be able to control it:
|
42 43 44 45 |
if (GetAsyncKeyState( VK_LEFT )) px--; if (GetAsyncKeyState( VK_RIGHT )) px++; if (GetAsyncKeyState( VK_UP )) py--; if (GetAsyncKeyState( VK_DOWN )) py++; |
You might notice you get an error – GetAsyncKeyState. Again you might need to search online to find out what this function belongs to and therefore what #include you need to add (sometimes Visual Studio can suggest and correct) – or every text scan all the headers on your system… Whatever the method you use to solve the compilation error, you would eventually find out it is apart of windows.h header file and then add:
|
3 4 |
#define WIN32_LEAN_AND_MEAN #include <windows.h> |
To make it point in the right direction, we can use tank.SetFrame() to select the correct frame from the available options. File ctankbase.tga has 16 frames; frame 0 points up, 4 points to the right, 8 is down, and 12 is left.
Obstacles
One particularly useful feature of a tilemap is that it allows us to specify quite a bit more than just the appearance of a tile. A simple extension of the functionality we already have is to store for each tile whether the player should be able to move over it or not. We can add a character to each tile for this, which we set to X if access is blocked, and to - if the player can move over it. Any other choice of indicators will do the job just as well, obviously.
In practice, it turns out that this is a bit harder to implement than you might expect. The player is not a point: we thus need to make sure that movement does not result in a position where any part of the player overlaps an obstacle tile.
An easy solution to this problem is to reduce the player (for collision detection purposes) to a square. Before accepting a move, we then first check the four corners of this square. Let’s create a small helper function for this.
|
23 24 25 26 27 |
bool CheckPos( int x, int y ) { int tx = x / 32, ty = y / 32; return map[ty][tx * 3 + 2] != 'X'; } |
Now, key movement is handled like this:
|
49 50 51 52 53 54 55 56 |
int nx = px, ny = py; if (GetAsyncKeyState( VK_LEFT )) nx--; if (GetAsyncKeyState( VK_RIGHT )) nx++; if (GetAsyncKeyState( VK_UP )) ny--; if (GetAsyncKeyState( VK_DOWN )) ny++; if (CheckPos( nx, ny ) && CheckPos( nx + 30, ny + 30 ) && CheckPos( nx + 30, ny) && CheckPos( nx, ny + 30)) px = nx, py = ny; |
In other words: rather than updating px and py directly, we propose a new position in nx and ny. A square starting at (nx,ny) is then checked using its four corners. Only if these tests are OK, are px and py set to the new position.
Besides collision information we can store all kinds of data in the tilemap:
- tiles that hurt or kill the player;
- tiles that contain a bonus or credits;
- tiles that make the player move in a certain direction (conveyor belts or escalators);
- tiles that behave like switches, and so on.
Further Improvements
There are many things that could improve the code we have so far:
- Map and tile size is specified using constants: consider using
#defineto make it easier to use different dimensions; - The top-left of the
ctankbasesprite isn’t exactly part of the actual object, so the collision box needs tweaking; - A map editor would be really nice to have.
Regarding program structure, it would be very nice if the tiles and the map would be isolated even more from the game. This is something we will deal with in the next episode.
Assignment
The assignment for this tutorial comes in two difficulty settings. The regular difficulty tests your ability to make minor changes to the base assignment. The hard difficulty will take more time and effort to complete. Which difficulty are you able to achieve?
Regular
- The current code renders the map starting at screen pixel (
0,0). Modify the code so that it can center the map on the screen. - Tweak the collision box of the tank sprite so that collisions are more accurate.
Hard
- Use all frames of the tank sprite: when changing direction, do this by turning in four steps.
- A matching turret can be found in the assets folder (ctankgun.tga). Draw it on top of the
ctankbasesprite (you may need to tweak the offset of the gun sprite to align it correct to the tank sprite), and make it turn in the correct direction with the tank, but with a slight delay. - Draw the tanks sprite exactly in the center of the screen, and scroll the map underneath the tank. Make the map larger, and make sure that tiles that are partially off-screen are handled correctly.
I followed the “player” section and it seems that I cant move the sprite by pressing up,down,left and right keys.Did i do something wrong?I put the ” if (GetAsyncKeyState( VK_LEFT )) px–; ” and the rest into the tick function,put ” int px = 0, py = 0; ” into tick aswell and finally “tank.Draw( screen, px, py )” into tick,yet the sprite is static.
Both the
Sprite tank( new Surface( "assets/ctankbase.tga" ), 16 );andint px = 0, py = 0;lines must not appear in theTickmethod. If they are in theTickfunction, that code will be called every time theTickmethod is called (which is about 60 times per second – depending on the refresh rate of your monitor). This will also cause thepxandpyvariables to be reset to 0, 60 times per second. This will result in the tank not moving.To solve this, make sure the
int px = 0, py = 0;does not appear inside theTickmethod.This is really clear, thanks for putting this together.
You completely and totally lost me with this:
char map[5][30] = {
“kc kc kc kc kc kc kc kc kc kc”,
“kc fb fb fb kc kc kc kc kc kc”,
“kc fb fb fb fb fb kc kc kc kc”,
“kc lc lc fb fb fb kc kc kc kc”,
“kc kc kc lc lc lc kc kc kc kc”
};
I don’t see anywhere in the code there is anything like a check for these values.
Could you explain briefly how this works? Later you say ‘X’ or ‘-‘ will determine if a tile is collideable or not but then never implemented this.
Thanks!!
I am thinking the key is to figure out what you are doing here:
int tx = map[y][x * 3] – ‘a’;
int ty = map[y][x * 3 + 1] – ‘a’;
how does this somehow wind up checking each cell for values like ‘kc’, ‘fb’, etc.?