
C++ Fast Track for Games Programming Part 1: Getting Started
Welcome to the first article in the Programming C++ Fast Track tutorial series! These tutorials are designed to take you from zero to a decent entry level in a somewhat smooth fashion. We start at the absolute basics: all that you need to get started is a laptop or PC, a fair bit of time, and quite a bit of dedication.
Previous Part: AINext Part: The Template
Regarding dedication: These tutorials are supposed to take you anywhere between two and four hours each. Aim to complete a minimum of two tutorials per week. That means that you have an extra workload of 4-8 hours. No-one said this was going to be easy, right?
If you need support while going through these articles, join the Discord channel https://discord.gg/gsxxaxc. You’ll have no problems getting answers to your newbie questions there. Lecturers and experienced programmers also roam this channel.
About the Authors
This course was originally created for the Games programme at Breda University of Applied Sciences (known as IGAD at the previously named NHTV); see https://www.buas.nl/games.
It was recently updated for the students of the Utrecht University as well; see https://www.uu.nl/en/organisation/faculty-of-science/education/bachelors-programmes.
This tutorial was written by Jacco Bikker, Brian Beuken, Nils Deslé, and Carlos Bott and updated for Visual Studio 2019 by Robbie Grigg and Phil de Groot.
Getting the Stuff You Need
For the purpose of these tutorials, I will assume you develop your games on PCs. The preferred development environment is Microsoft’s Visual Studio 2019. A free version (the Community Edition) of this software is available from Microsoft, via https://www.visualstudio.com/downloads.
Checklist:
- A PC or laptop, pretty much any CPU and GPU will do
- Windows 10 (32-bit or 64-bit)
- Visual Studio 2019 Community Edition (Professional and Enterprise more than welcome), installed with default settings
Starting Visual Studio 2019
When you start Visual Studio 2019 for the first time you are greeted with this window:
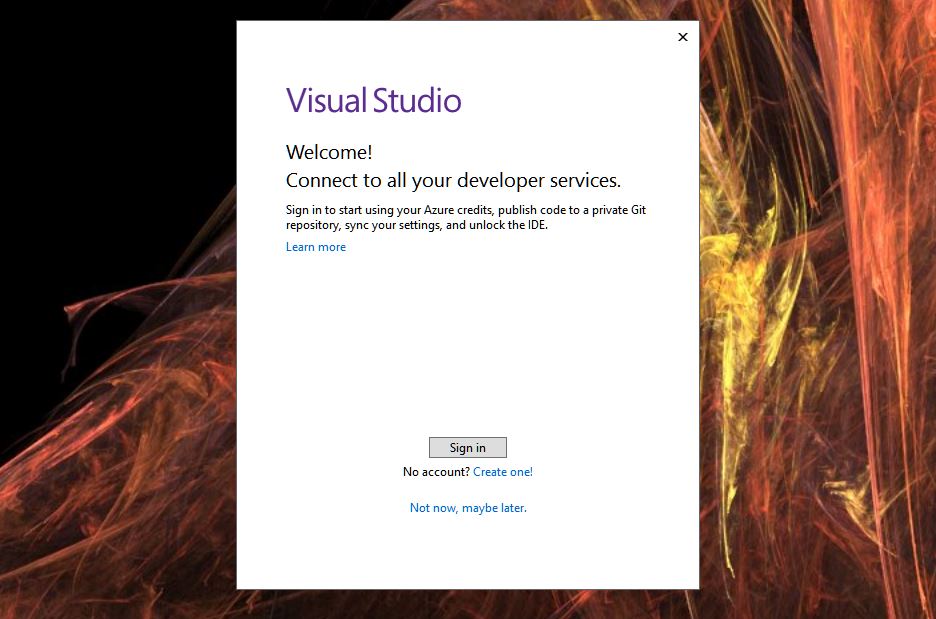
Visual Studio installation splash screen to sign in or not to sign in – that is the question…
Selecting not now, maybe later is luckily a perfectly viable option, so let’s go for that (no need to leave any more personal information with a tech giant than strictly necessary, right?). In the next window, you get to choose a theme. As the window says, you can always change this later, so let’s go with dark. Now we finally get into the Integrated Development Environment (IDE)
Create a New Program
Now that you have Visual Studio up and running, select the 4th option Create a new project as pictured:
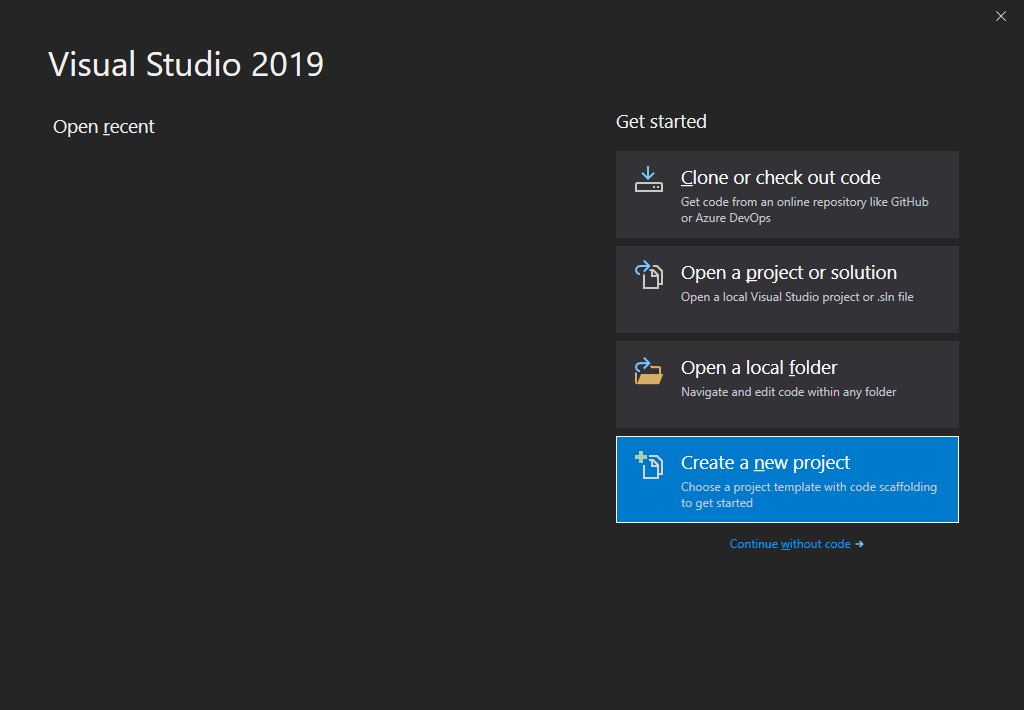
Your first adventure will be to create a new simple project using Visual Studio.
You then need to select the type of project. Because we are building a very simple project then select Empty project as you can see here:
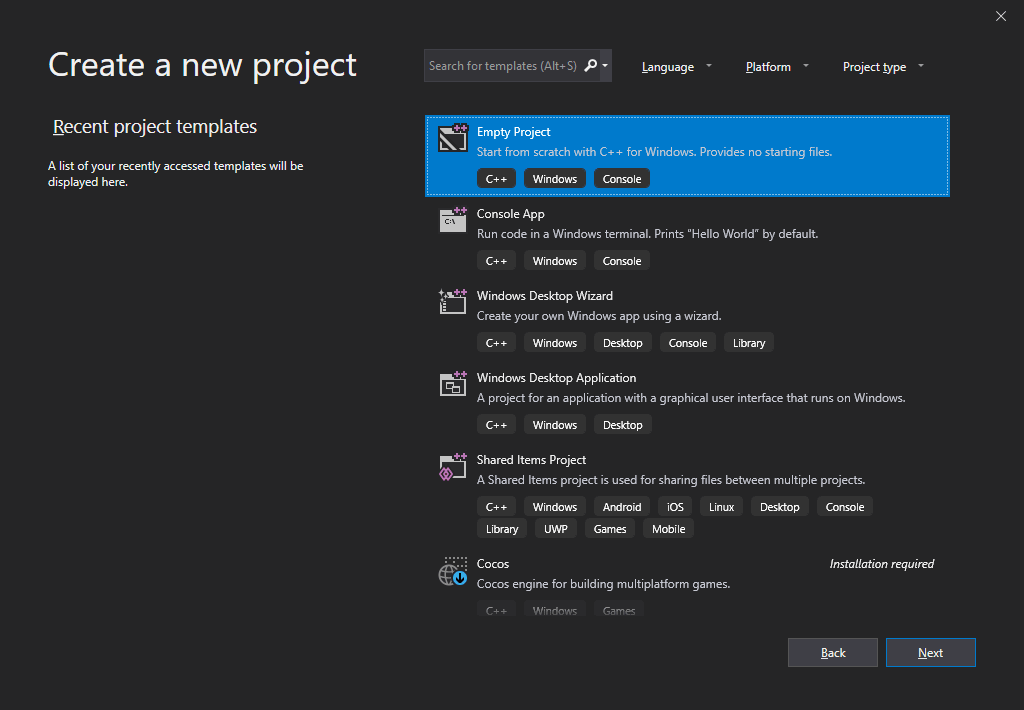
Starting with an empty project means we do not have to delete as many things later 😉
You now need to change a few things in the following dialog – this is all about where you place your files.
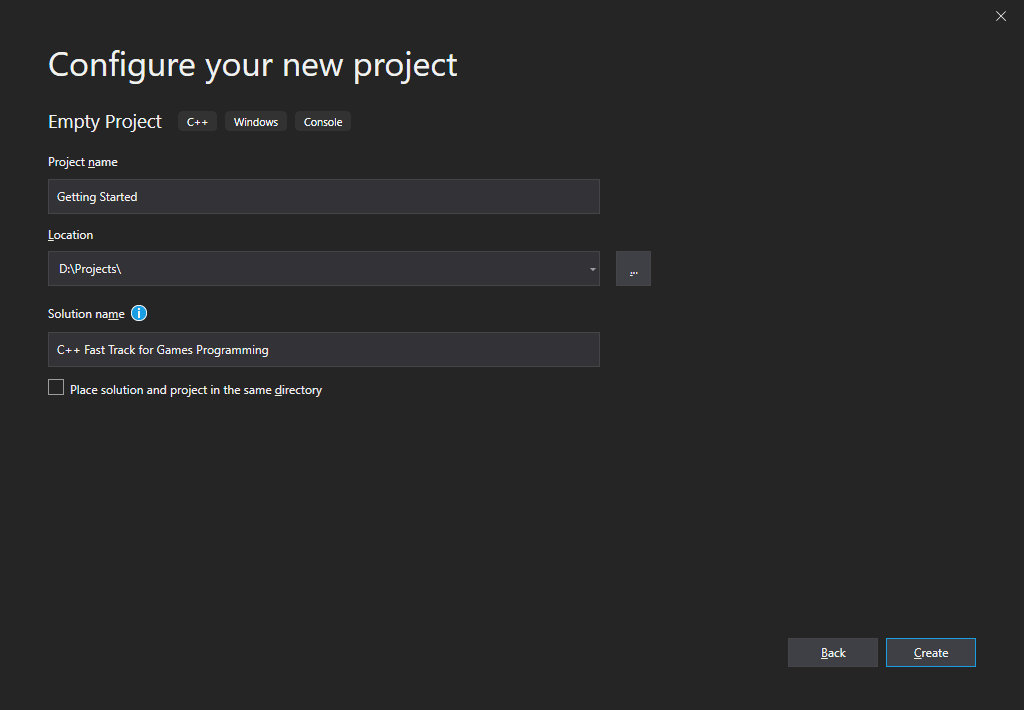
You may choose any folder you want to create your new project.
Set the Project name to Getting Started
Set the Location to C:\my_projects (or whichever folder you keep all of your programming projects).
C:\Users\[username]\Desktop) folder or in your Documents (C:\Users\[username]\Documents) folder because these folders are indexed by the Microsoft indexing services to improve search performance. The indexing services will have a negative impact on the performance of the build process and for this reason, it is recommended to save your projects in a folder that is not being indexed by the indexing service.Set the Solution name to C++ Fast Track for Games Programming
Click the Create button to create your new project!
You should see something similar to the screenshot below.
You should have an empty project.
IDE Tidy-Up
Optionally, you can skip ahead to the Hello World section below.
As you can see, there is a lot of stuff on the screen. Let’s make some room:
- Click on Team Explorer, then close it to get rid of it. The Team Explorer can also be hidden by selecting View > Team Explorer from the main menu.
- Do the same to Toolbox and Properties.
- Drag the Solution Explorer to the left of the screen.
- If you don’t like toolbars and their buttons then on the main menu, click on View, go to Toolbars, and deselect Standard.
You should now have something like this:
Almost there…
I often see people work on the area of a postage stamp (not just when programming) due to all the toolbars: this layout prevents that. We didn’t remove anything that we need (apart from one thing), and we assumed control of the software in the process.
The one thing we are missing is two drop-down boxes (OK, so two things). We can store these next to the menu bar, so they don’t need their own toolbar.
In the main menu, select Tools > Customize and select the Commands tab. Now click on Add Command, select the Build category, and choose the Solution Configurations command. This adds the drop-down box to the left of your menu bar; click the Move Down button a few times, until it is all the way to the right. Repeat this for the Solution Platforms command.
The top of the screen now looks like this:
Now your IDE has some space to breath!
And the IDE is as tidy as it gets for now.
Solution Explorer Tidy-Up
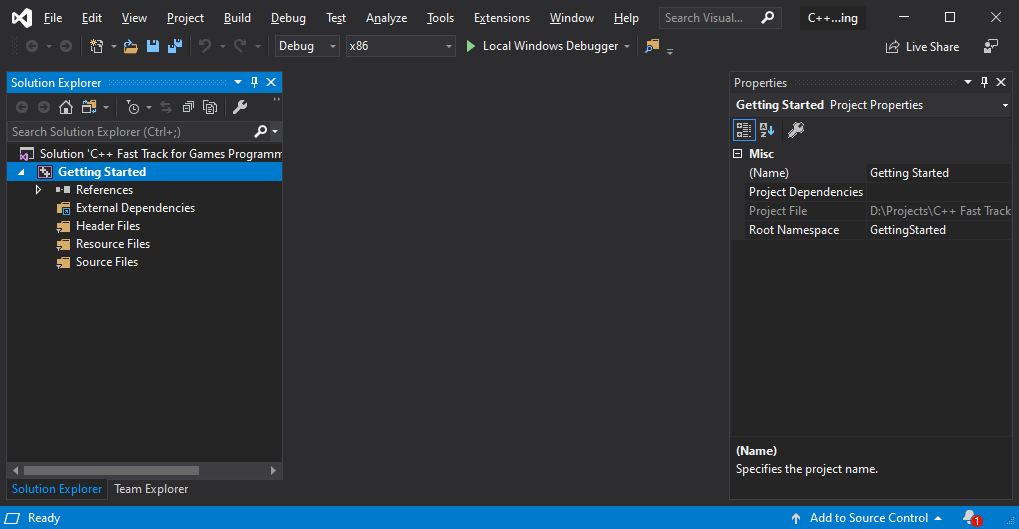
Your Solution Explorer should currently look like this:
Your ‘solution’ (although you didn’t solve anything, but whatever) should look like this now.
Now, let’s delete some things we don’t need: Select all three folders (Header files, Resource files and Source files and delete them.
From the main menu, select Tool > Options and expand Text Editor > C/C++ > Advanced option or search for “Disable External Dependencies Folder” in the Search Options (Ctrl+E)
Set the “Disable External Dependencies Folder” option to true.
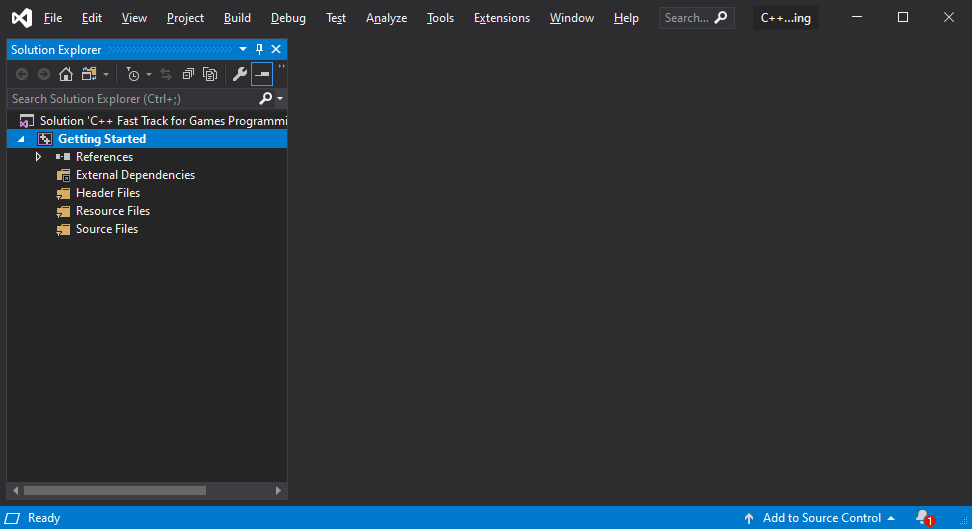
Your solution explorer should now look something like this:
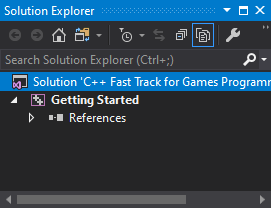
Your solution explorer should be totally clean now.
Before we go on:
That being said, let’s get coding!
Now it’s finally time to add a C++ source file to play with. Right-click on your project Getting Started in the Solution Explorer and select Add > New Item.
In the Add New Item dialog that appears, select C++ File (.cpp), and name it main.cpp (or anything else really, as long as it ends with .cpp). Then click the Add button.
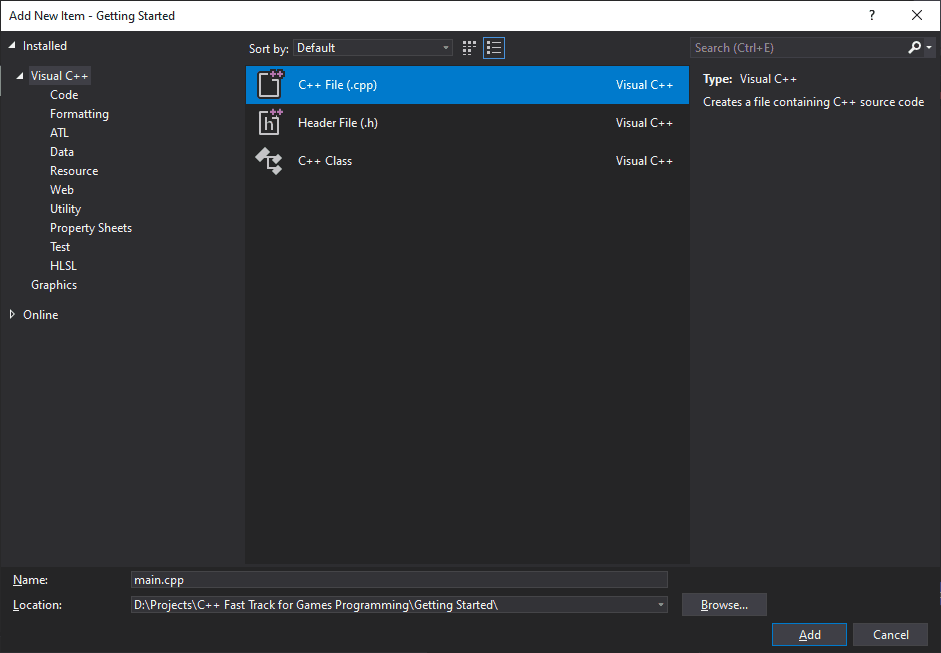
We just need the one .cpp file for now.
The new file is immediately opened, and we’re ready for some coding.
Hello World
A tutorial on C++ is not complete without a ‘hello world’ example, so here we go. Enter the following program:
|
1 2 3 4 5 6 7 |
#include "stdio.h" void main() { printf( "Hello world!\n" ); getchar(); } |
You can start the program by hitting F5. Visual Studio will ask you if you want to build the program; you want this so click yes.
You should see a console window with the text Hello world! printed in it.
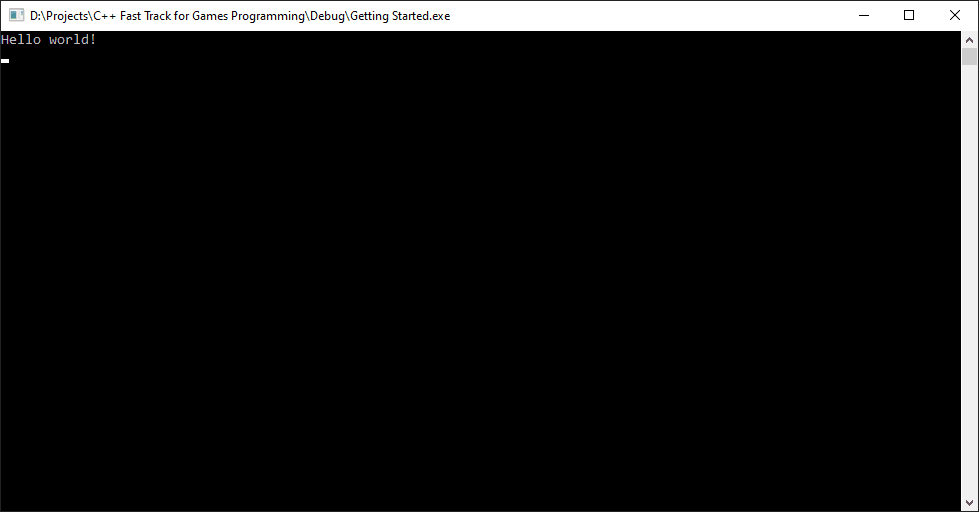
You should see a console window with the text “Hello world!” printed in it.
Press Enter (while the console window has the keyboard focus) to close the console window.
Discussion
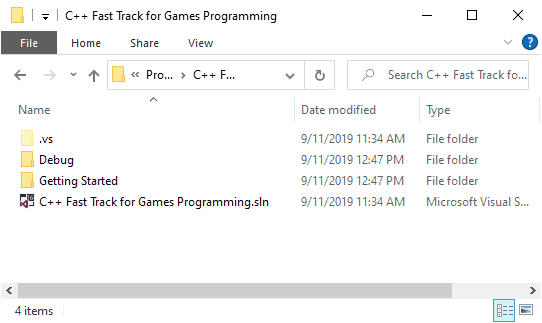
When you go to D:\Projects\C++ Fast Track for Games Programming (or wherever you saved your Visual Studio solution files) you will see that Visual Studio created a large amount of files for you. The most interesting one is in the Debug folder, and it’s called Getting Started.exe. When you start this application, you will see that you created it yourself.
Apart from this file, we have:
C++ Fast Track for Games Programming.sln: your solution file, which points toGetting Started.vcxproj: your project file, which points tomain.cpp: the source code file.
A project can have multiple source files, and a solution can have multiple projects. Other files:
Getting Started.vcxproj.filters: stores the references to all of the source files in your project;Getting Started.VC.dbandopendb: some internal information for Visual Studio;- various other files in the Debug folder:
.obj,.ilk,.pdb.
Quite confusing perhaps, but all that matters right now is the .cpp file in Projects\C++ Fast Track for Games Programming\Getting Started folder and the executable that it was built from it.
It is always good to understand what each file is for – especially when it comes to working out which ones you need on GitHub or Perforce (hint: Never commit compiler generated content to version control!)
.vs folder as shown in the screenshot above, make sure you you select “Show hidden files, folders, or drives” in File Explorer Options in windows control panel.
To change this setting, open the Windows control panel and go to File Explorer Options, then the select the View tab, and select the Show hidden files, folders, and drives radio button.
If you don’t see file extensions (.sln, .ccp, and .h) in the File Explorer, make sure the Hide extensions for known file types is not checked as shown in the screenshot below.

Assignment
So, here’s your task:
- Every article in this series will end with a small practical assignment. You need to complete this assignment. Feel free to share your solution on the 3dgep.com Discord server: (https://discord.gg/gsxxaxc).
- Create an executable that prints your name 10 times, then waits for a key, then prints Coding is awesome! 10 times, then waits for a key again, then exits.
Previous Part: TitlesNext Part: The Template
Are there any restrictions on how the exercise should be resolved? Or can we use everything we want (for example, add some #include for string manipulation)?
You may use whatever you would like to solve the exercises.
I’ve notice two “.vs” folders one on solution level and the other on project level.
In order to use version control properly should I add the “.vs” folder to my gitignore file?
Thanks!
Isaac,
Generally, you can safely ignore hidden files and folders and files that are generated by the IDE. The
.vsfolder both hidden (by default) and generated by the IDE. In this case, I would highly encourage you to ignore the.vsfolder by adding it to your.gitignorefile.First of all thank you in advance for the high quality info your are putting here! Second, is it a problem to do the classes/tutorials using a mac, for example on (Visual Studio for Mac)? Thanks in advance!
Djakson,
The tutorials (and the corresponding source code that is provided) are tested on Windows. Using other platforms is not recommended (but may be possible).
Just as Djakson said, thank you so much for the professional content that you’re providing here. While I will follow through with the course without a doubt, I was just wondering if there’s any way for me to get a certificate for it.
If you wish to get a college degree in game development, you can apply for our games program in the Netherlands: Creative Media and Game Technologies.
How can I contact the teachers for cheking my assignment?
Consider joining the Discord Server: https://discord.com/invite/gsxxaxc
What would be the appropriate channel on the Discord Server to submit and assignment?
There is a buas-assessment channel you can use.
Santosh,
A while loop is one construct in C/C++ that you can use to perform a repetitive task, but for this solution, a for loop would be better.
See: https://www.w3schools.com/cpp/cpp_for_loop.asp
Santosh,
A while loop is one construct in C/C++ that you can use to perform a repetitive task, but for this solution, a for loop would be better.
See: https://www.w3schools.com/cpp/cpp_for_loop.asp
i ave just started this course.. and the comment at the end says :
“Every article in this series will end with a small practical assignment. You need to complete this assignment, and send the result to one of the programming teachers. Once you have done so, you may continue with the next part.”
how do i do this? or was this part of the original text for the original course : “This course was originally created for the Games programme at Breda University of Applied Sciences (known as IGAD at the previously named NHTV)”
should i just ignore this “requirement”?
just in case.. I thought I would cheat.. and create :
By the way – this generates one warning because the return value of
getchar()is completely ignored.This is not cheating, this is a perfectly valid solution! This is the first time I’ve seen someone solve this with a nested for-loop. It’s a bit convoluted, but it is functional.
I’ve updated the text to share your solution on Discord 😉 Most of the programming lecturers are also members of the 3dgep.com Discord server.
I got an LNK2019 Error that I don’t know how to solve. From what I understood this has something to do with the fact that it can’t find the definition for the main symbol anywere. But knowing this has not made me able to resolve a solution.
I don’t have enough information to answer your question. Consider asking on the Discord server: https://discord.com/
You’re missing the ” ” from #include
I will be following this course… Because I’ve wanted to use C++ to put a sprite on the screen for a long time now. That’s always been the hard part and it seems you guys get to sprites VERY quickly in this course!
Anyway… Besides just… typing out the print command 20 times to do the final task… Here’s some sloppy code I copied from elsewhere to do it with a loop.
Runs fine on my comp XD
I think it has some extra includes it doesn’t need, but it runs.
Thanks for this guys. Once I can control sprites I will be off to the races.
Okay, but you can append the newline character directly to the string:
Okay, but you don’t need a for loop to print “Coding is awesome!” once.
#include <stdio.h>
void main()
{
for (int i = 0; i < 10; ++i)
{
printf("Lynn\n");
}
getchar();
for (int i = 0; i < 10; ++i)
{
printf("Coding is awesome!\n");
}
getchar();
}
erm this doesn’t seem quite right, how do I get it to be formatted as code (like in the other comments)?
Also my #include disappeared D:
Hi! I was wondering if we can use the version of visual studio code, and if I can use the unreal engine for the assignment?
Hey here is the solution for the assignment.
#include
int main() {
for (int i = 0; i < 10; i++) {
std::cout << "Suraj\n";
}
std::cin.get();
for (int i = 0; i < 10; i++) {
std::cout << "Coding is Awesome \n";
}
std::cin.get();
return 0;
}
The solutuion I found online that some one posted
#include “stdio.h”
void main()
{
int I = 0;// This is the first value that get printed
do
{
printf(“hello world\n”);
getchar(); // This enter a new line
I++; // this will help increase the value , in this context
}
while(I < 10); // This 0 – 10, and will print the amount number before 9
}
The I++ increase the value meaning the text the that we want to print.
Do is self explanatory,
The int I = 0 , the 0 represent the first value, while(I < 10) ,this mean from 0 to 10( First to tenth value) 0 is less than 10 , this declare that each Text(Hello world)
up to 10 times
While looking at people response , your response to them, took me to w3 school(which I'm familiar with) and there's version of this which short and simple:
for (int i = 0; i < 10; i++) {
std::cout << "Coding is awesome!" << "\n";
}
This code worked for me, oddly I had to change void main to int main or it wouldn’t compile. Can anyone explain this? Also I thought printf was specific to C. It works with a .cpp file too.
#include
int main(void)
{
for(int i = 0; i < 10; i++)
{
printf( "Sebastian!\n" );
}
getchar();
for(int i = 0; i < 10; i++)
{
printf( "Programming is awesome!\n" );
}
getchar();
return 0;
}
not sure how to do the format like the others, but here’s my code:
#include
int main()
{
for (int i = 0; i < 10; i++)
std::cout << "hello\n";
getchar();
for (int i = 0; i < 10; i++)
std::cout << "coding is awesome\n";
getchar();
return 0;
}
#include “stdio.h”
void main()
{
for (int i = 1; i <= 10; i++)
printf("Saba\n");
getchar();
for (int i = 1; i <= 10; i++)
printf("Coding Is Awesome!\n");
getchar();
}
At the start I did not understand what this "\n" was doing but after I saw my text was repeating on the same line I tried adding it and saw that "\n" is took in consideration as an "enter" key
#include “stdio.h”
int main()
{
for (int i = 0; i < 10; i++ )
{
printf("Vejas\n");
}
(void)getchar();
for (int i = 0; i < 10; i++)
{
printf("Coding is awesome!\n");
}
(void)getchar();
}
can you give me details to work this on MacBook
Sorry.. this framework was not made to work on the MacBook… You might have some luck with Wine, but I haven’t tested it myself.
You’re better off using another framework like SFML or SDL3…